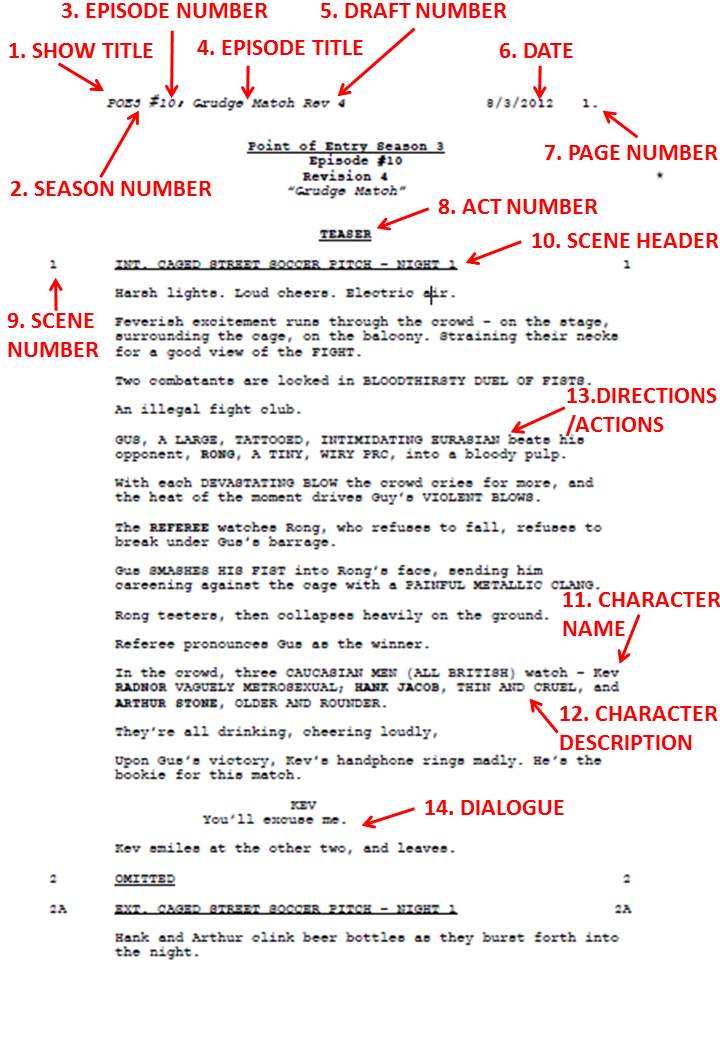
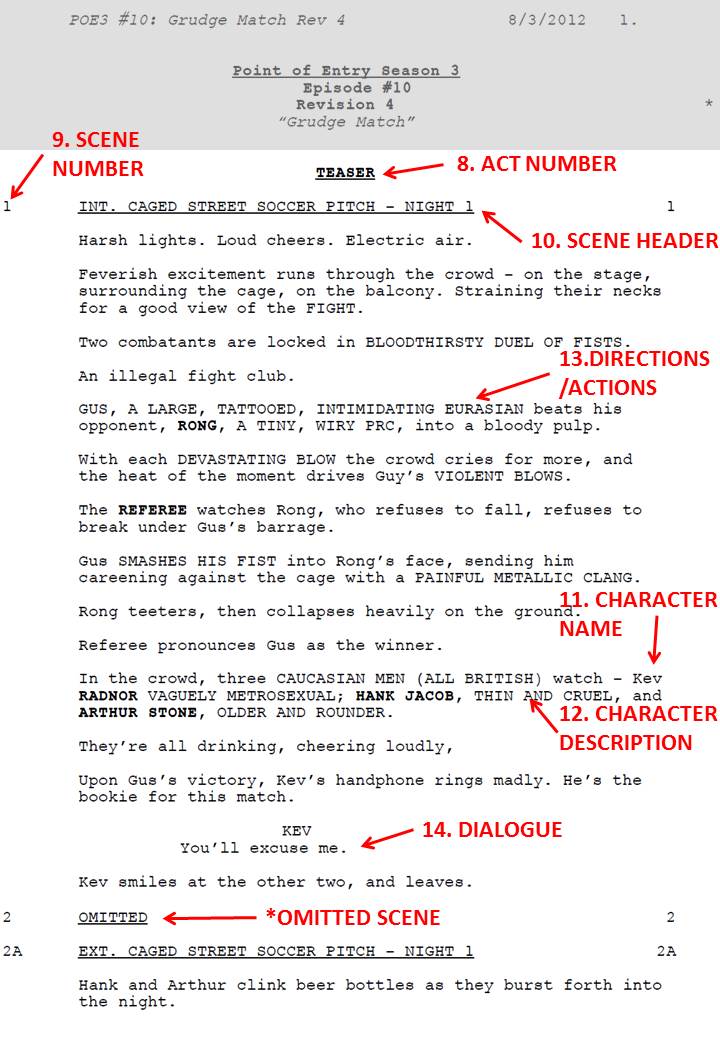
Previously, I had talked about the components of a script in the header. For reference, here is the annotated page of a script again.

Now let’s move on to the body of the script, and what each section means and requires.

Body Components
While the header and title serve to tell you which episode and how updated your script is, the body gives you the information to execute the actual production itself. And you’ll spend most of your time writing the body anyway, so the faster you get used to the format, the better.
8. Act Number: An Act is an uninterrupted segment of an episode. Acts are separated by commercial breaks or the opening titles (theme song and introduction sequence). Start each Act on a fresh page for neatness (don’t want people to be flipping around trying to find where the new Act begins), and close each Act with a centre justified “End of Act One/Two/Three” in the same font that you use to label your Act.
Generally, a half hour comedy has these Acts – Teaser, Act One, Act Two, Tag; while a one hour drama has these Acts – Teaser, Act One, Act Two, Act Three, Act Four. Teasers are usually one or two pages long, and they’re meant to hook you into watching the show. Opening titles run after the Teaser, then Act One – Act Four goes. An Act is anything from 8 – 12 pages – anything longer and your episode will look lopsided. If you have a comedy, you’ll sometimes end with a Tag, a one – two pager that gives the final punchline for that episode.
9. Scene Number: Critical, because it helps to identify the scenes. Since scenes have no title, the only way to identify them is by number – hence the importance of the scene numbers. Of course, it has to be in running order – so that if a person is shot in Scene 7, you’ll see him with a gunshot wound in Scene 8.
* Omitted: Sometimes, you’ll see scenes that are omitted. They aren’t deleted, because if you do so, there’ll be a missing scene number and the immediate assumption will be that someone left it out. If you put “omitted,” you’re indicating that there used to be a scene there, but not any more, so nothing has been left out. Like with many seemingly redundant components, this is for clarity of production.
10. Scene Header: This indicates all the pertinent information about the location of the particular scene. The beginning indicates Int. or Ext. Int means the scene is indoors, Interior; Ext means the scene is outdoors, Exterior. The difference between the two is primarily weather, and what time of day it is. While it may be hard to fake a night scene if you shoot outdoors in the day, it is possible to fake night or day scenes indoors, and this gives the scheduler an indication of how flexible her schedule can be.
The middle portion states where the scene is located, which is then given to the location researcher to find.
The final portion states whether it takes place in the Day or Night, and whether it’s the same Day or Night. All scenes that take place in the same day have the same number – so Day 2 and Night 2 happen one after another. Days are also in numerical order, so if the character is wearing the same shirt from Day 1 to Day 6, while it may look clean in Day 1, it will probably be dirty and stained by Day 6. This is for the costumes and props department to give the appropriate outfit.
11. Character Name: The first time you see a character, his name should be in CAPS and in BOLD, to indicate this is his first appearance. Subsequent appearances don’t need his name to be in CAPS although some writers do that for clarity (I don’t for the sake of readability). It should also be accompanied by:
12. Character Description: The first time you see a character, give him a description. If you don’t know what to put there, give his age, gender, and occupation to start with. As you continue writing, you’ll know to put just the pertinent information so that the casting director has some leeway in casting your actors. So in the above example, I didn’t give their age or occupation, but I did describe the impressions they gave as that was what I really needed from those actors.
13. Directions/Actions: This is, arguably, the bulk of your script – what they do when they’re not talking. It’s best to be short and sweet here – long chunks of direction don’t get noticed, but short lines do. In my case above, since everything is really a big fight sequence, I broke the paragraph up into several key sentences to help with the readability. Imagine if it were one big half page chunk. Nobody would read it.
14. Dialogue: I’ve specifically put this last, because everyone assumes that a script is all about dialogue. Dialogue is critical, of course, but the story is what the script is about. Dialogue is always centre justified, with the speaker’s name preceding the dialogue. Leave a space before the speaker’s name and after the dialogue for clarity. If the speaker talks, does an action, and talks again, Final Draft will add (Cont’d) in the second piece of dialogue to show that no-one else speaks.
If you have to indicate that the speaker talks with a certain kind of emotion, you can put it in (parentheses).
And that’s it for the components of a script! Hopefully, this will give you a better of idea who you’re writing for (not just the audience, but the production crew) the next time you bang out a script.
Leave a Reply